Saturday, July 23, 2011

8% Bodyfat

   This article is one that has taken some time to get to, namely since Ive been trying out a nutritional plan that I did NOT develop but wanted to evaluate for myself and on others, and now that I am convinced that it can be done, I will share it with you. This nutritional solution is pretty effective and gives you several options, and was developed by none other than Dave Palumbo. To be honest I thought I would HATE eating this way but it is very similar to the way I normally eat now. And you wont starve yourself eating this way, actually it forces you into a schedule which most people need anyway. Now, this solution CAN bring you to sub-8% bodyfat, but it will not do so overnight, or after a week, unless you happen to be starting at 9% BF, and if you are there, chances are you dont need this nutritional solution.
Chicken and Almonds FTW

There are only a few rules:
  • Eat every 3 hours (this includes within 30 minutes of waking and within an hour of bed)
  • DONT SKIP MEALS
  • IM SERIOUS DONT SKIP MEALS
  • Give it a week and see if you havent seen any results. (this assumes that your metabolism and hormonal levels are near normal)
 Here are your options, eat ONE of these every 3 hours.
  1. 8 oz. Chicken or turkey + 1/2 cup almonds
  2. 8 oz. lean fish (tuna, flounder, catfish, etc) + 1/2 cup almonds
  3. 5 whole eggs
  4. 8 oz red meat (ground beef, flank steak, etc) + 1 tablespoon olive oil
  5. 50 grams whey protein isolate + 1/2 cup nuts
Notes:
  • 1/2 cup of almonds can be substituted with 2 tablespoons of peanut butter
  • you can eat unlimited amounts of these with any meal:
             Broccoli
             Kale
             Asparagus
             Brussels Sprouts
             Collard Greens
             Spinach
  • For every 10 lbs ABOVE 200 lbs, add 1 oz. protein to each meal (if you weigh 220, add 2 oz, so meal option #2 would be 10 oz tuna + 1/2 cup almonds)

Thats really all there is to it.
Thanks to Tim Ferris for your wonderful book, to the genius of Dave Palumbo, and Sean Esna for the stimulus to write this article.

Saturday, July 9, 2011

Band (Dis)Traction - Part 2 of 2

   If you have read Part 1 of this article, you should be somewhat familiar with band traction and how it tractions particular joints for beneficial, pain-reducing effects. If you have read the knee article, you should be familiar with how traction and distraction work in similar ways. If you arent familiar, please go and read the articles linked above for a brief review.
   We know from earlier that band distraction is essentially traction with movement through a ROM(range of motion) and that we usually use less band tension to accomplish this than we would use for static traction. Technically this distraction is known as "Band-Assisted Joint Distraction w/ Active Circumduction" but I don't wanna see people's heads explode every time I try to describe this. Band distraction can be used as part of a thorough warm-up, and if used with a compression device (neoprene sleeve, ace bandage, etc.) on the joint being distracted, can markedly improve the joint feel. We will try to cover band distraction for most major joints, but knee distraction has been covered a bit in the previous article, so there will just be an alternate distraction setup for the knee here.
   Wrapping the joints before distraction work is NOT necessary, but I feel it so strongly correlates to pumping blood better into a joint/joint space and removes grating/pressure upon nerves or bone/cartilage that I am adamantly stating right now that you should research and learn how to wrap the joints if you dont have compression clothing, etc. Youtube is excellent for learning how. You should have no excuse to not know how to wrap/splint/tape.
The ULTIMATE method of distraction would be to:
1)Ice for 2-3 minutes, dry off.
2)Apply Icy Hot/Blue Heat/Equi-Block/etc.
3)Wrap joint/bodypart to be distracted
4)Apply band distraction.
5)Observe the decreased joint pain and increased ROM. Smile.


Shoulder/Rotator Cuff Distraction
Step 1: Wrap band around wrist, step away from anchor, and allow tension to pull the shoulder joint longer.
 Step 2: Thumb and hand should rotate 90 degrees clockwise for the right hand, and 90 degrees counterclockwise for the left. Thumb should start by pointing across the plane of the body and rotate upwards till pointing straight up. At the same time, the shoulder joint should be shortened by 'sucking the arm back into the socket,' I know this is not a good description of what happens here but if you play around with it you will find out what I mean; this action is done against the band tension. We start with the band pulling the shoulder and arm directly straight out to the side and repeat 5-10 reps before gradually turning to face the anchor and repeating. This method I usually reccomend 5 reps, rotate in, 5 more reps, etc. until you have turned in 4 times in succession until you are facing the anchor.


Elbow Distraction
Step 1: Tie a slip knot around the elbow and anchor the other end of the band (mini bands work well for this) around a post, a peg on a rack, a doorknob, etc. 
Setup
 Step 2: Create a closed-chain movement by placing hand on to a surface that you will not move it from during the movement. In this case, the ground works, but you can perform this movement on a barbell sitting in a rack, with one hand on the barbell and the other end of the band around an upright on the rack.
Photo 2
 Step 3: Flex the elbow joint against the resistance and allow it to pull back into a nearly straight/locked out position. Once you reach this position the series is simply an alternation of photo 2 and photo 3. You should flex the elbow several times in this position (5-10) and then move it a hand's width farther from the anchor point (increases the tension in the band slightly each time). Repeat until A)joint feels better, or 2) you run out of room or the band snaps. 40-50 reps total on each elbow is common.
Photo 3
Hamstring (epsecially inner thigh/lower glute muscles) Distraction
Step 1: Loop band around upper thigh, step away in a side lunge position. Focus must be made to extend the leg under tension.
 Step 2: Allow for the band tension to slowly pull the body back upright and allow the knee to bend slightly at the top. Repeat step 1 & 2 for a total of 30+ reps, at varying angles toward/farther away from the anchor point.


Glute + Hamstrings Distraction
Step 1: Loop band around lower back (use average or strong bands for this), and squat excessively far back with your hips. The band should keep you upright in this overly backwards-sitting squat.
 Step 2: Allow the band to assist you in returning to the standing position. As with most band distraction, facing away in several directions as you repeat this series of steps is a good addition. 50+ reps with this distraction due to the size/strength/capability/importance of these muscles/muscle groups.


Knee (alternate) Distraction
Step 1: Slip knot a band around the knee joint, pulling away/behind.
 Step 2: Walk away to generate band tension. Ensure that foot is pointed directly ahead. Start at what appears to be a half-kneeling/half-squat/split-squat stance, and bend the rear knee against the band tension. Allow the band to slowly pull the knee back into a more extended position.
 Step 3: Refer to the photo below to observe that the knee does not need to lock out, nor should it, before you begin the split-squat manuver again. 20 total reps, without any angle change, is all that should be needed here. Most of the weight should be on the front leg, and this is NOT any indication on how to squat correctly. This is simply moving the knee through resisted flexion.


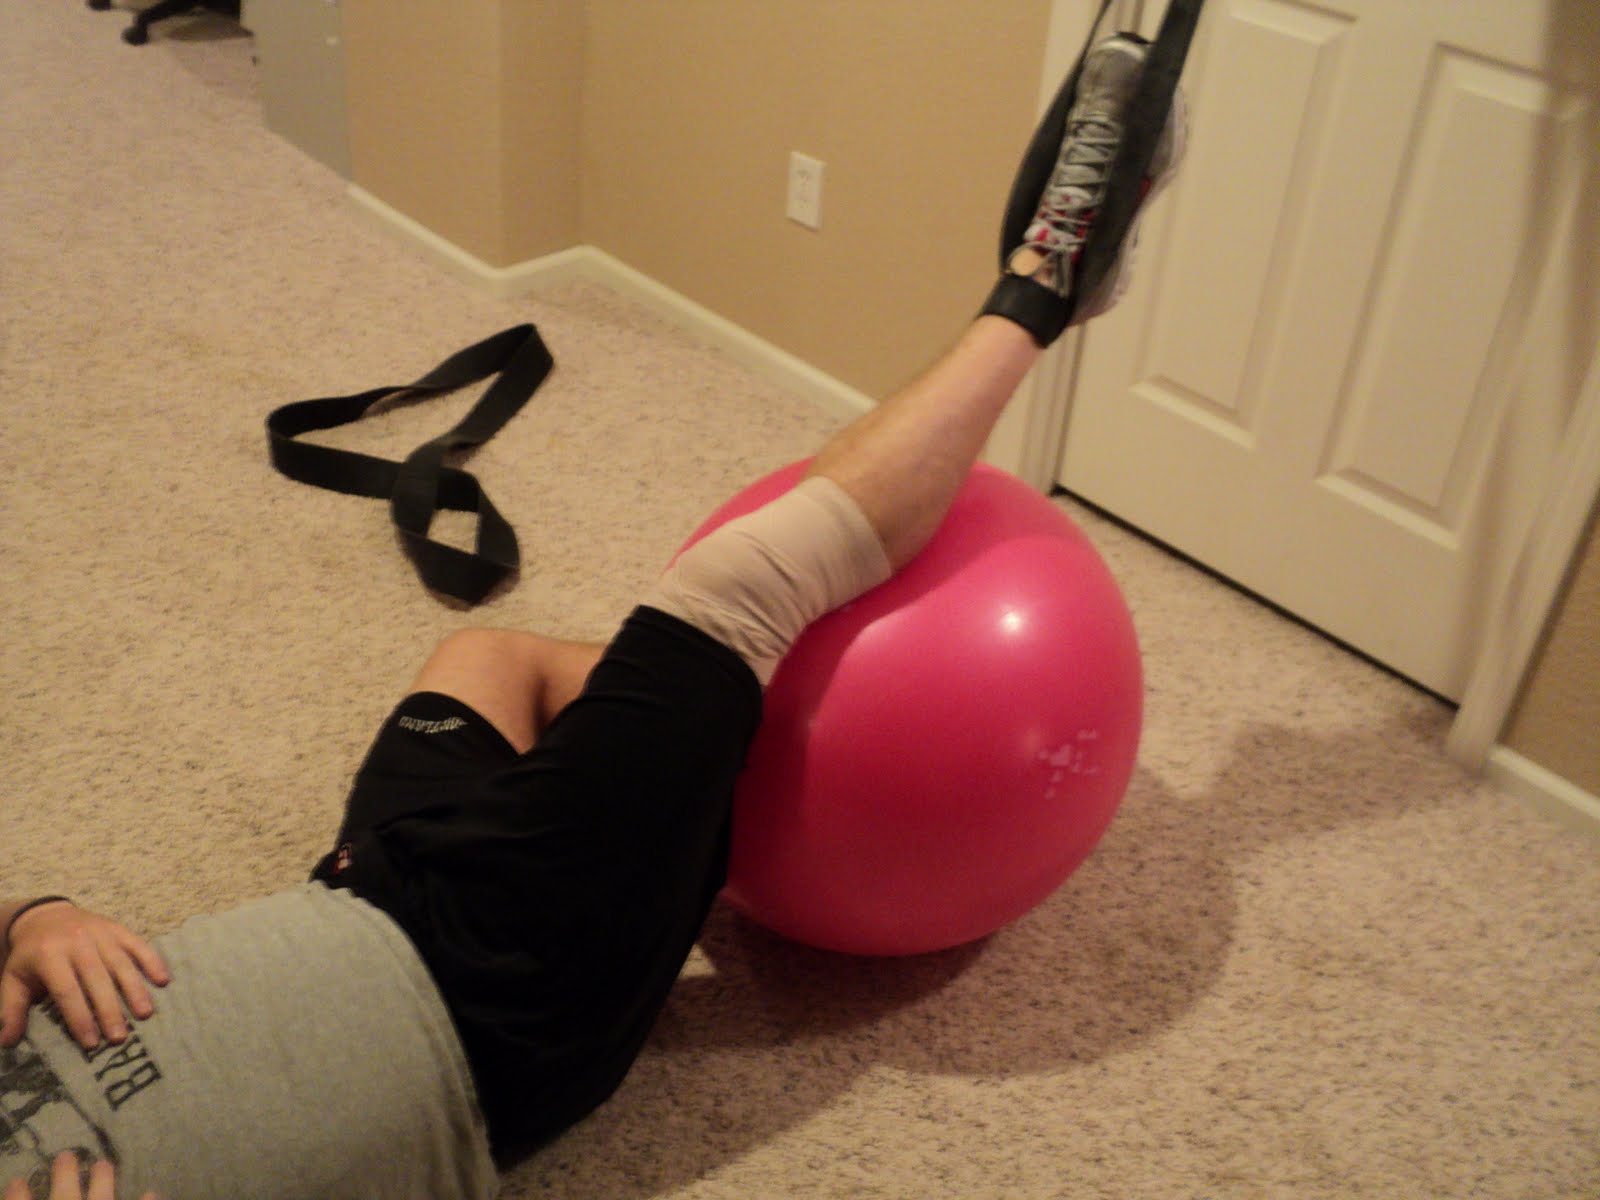
Lower Back + Glute Distraction
Step 1: Position yourself as shown at a wall or power rack, with the band anchored securely above.
 Step 2: Cross legs at the ankles (slightly above works too)
 Step 3: Extend hips and raise the glutes and lower back off the floor.
 Step 4: Bend at the hips and gradually allow yourself to lower back to the floor. This can also be done as shown in Dick Hartzell's video on Lower back Rehab/Traction video in Part 1 of this article. Legs/hips can be distracted independently by leaving one leg paralell to the floor while movement/distraction occurs on the leg wrapped around the band. 20-30 reps seems to alleviate much of the lower back pain.

Hip Distraction
Step 1: Loop band around one thigh, fairly high up, and turn away. The trailing leg should be in traction. Bend the leg at the knee and pull with hips forward to bring your knee closer to your chest.
 Step 2: Once you have brought your knee close to your chest, allow the band to pull the leg back to a semi-straight position again. And alternate through these series of photos, step1 and then step 2. Reps are up to the individual, as the hips are VERY tight for most American people, but can loosen dramatically with this distraction. Personally I use 15 on each hip if I feel they arent working/firing correctly.
 This covers the most common band distraction methods for alleviating joint pain, as well as several that are quite uncommon. Feel free to use/adopt what works for you and discard the rest.

Thursday, July 7, 2011

Special knee traction/distraction/rehab article!

   So as someone with quite a bit of experience w/ knee injuries, I have put together an article (short and sweet, just like Josh Kim) on a veriety of treatments. These are not all used effectively together, but in some cases they can work all together. With that said, identifying the issues that caused the knee issue/injury is paramount of importance. The knee is a hinge joint and SHOULD only operate in one plane. Take a car door and twist the top away and the bottom of the door toward you and see if the car door closes well after (NOTE: dont really try this; if you actually do this the damage, and the responsibility, is up to you. This is just for mental imagery). That would be an example of forcing a single-plane joint to move in a dual-plane manner (through shear forces) and will certainly result in the destruction of the joint.
   Since the body works in kinetic chains, observe the mobility (or lack of) of the ankle and hips. Do the ankles dorsiflex beyond 90 degrees? do they evert (tilt outward-facing at the bottom of the foot) or invert (opposite of evert) at or near end-ROM for plantarflexion or dorsiflexion? What about the hips? Are the hip flexors chronically shortened and overtight (if this subject is American, then the answer is a resounding yes 99.99% of the time), and are the glute /hip complexes able to effectively rotate the femur inward and outward at all points of hip flexion/extension? Check all these points to observe what issues the kinetic chain is placing on the knee. An example is the lack of femur rotation outward near the bottom of a squat (almost end-ROM for most ppl) causing varus stress on the knee and possible overtension of the MCL.
Band Traction
Band traction for the knee is iffy business. If the ligamentous tissue is damaged this could result in serious pain and/or injury. Even meniscal damage can cause some pain due to the vacuum suction-like effect when pulling apart the joint space. With that said, however, feel free to give it a try. If it helps, use it. If not, avoid it.
Knee Traction #1
Wrap the knee before traction and distraction
Knee traction on swiss ball
Alternate view of traction on knee
 With this first setup you should ensure plenty of time is spent in traction before moving anything. A friend can push down on the band about midway between the anchor point and the attachment to the body to generate more tension for additional traction. Also, gradually rolling the swiss ball back underneath the knee, inches at a time, will eventually get the knee joint open and lengthened.

Knee Traction #2
This alternate setup is more aggressive and should be approached mildly at first to evaluate the appropriateness for the individual and their particular issues.
Tension on the ankle and above the knee

Additional tension by looping around the elbow and pulling upward
Be sure to use lighter bands (minis work well) to start with. This can generate serious torque forces on the knee joint if not careful. Allow to move through a range of motion for the knee before considering this done.

Band Distraction
Band distraction is very similar to traction, except the tension is less than with traction, and this is dynamic traction through a ROM essentially, where traction by itself is simply static. Move the joint around through a ROM, and use additional help moving the body/joint complex against resistance if needed. An example is Knee Traction #2, the band looped above the knee joint, that setup can be used if you arent strong enough (ie your hip flexors) to move the knee through a decent ROM against the band.
Extended in distraction

Partial flexion in distraction
   Remember, band distraction is all about movement + traction. Ensure that while in distraction, the knee can move in flexion/extension with the femur in inward/outward rotation positions as well. If you find a weakness, that is your new enemy. Kill it. If the knee is not able to flex at such a large ROM with the femur in external rotation, it looks like a 10 min squat test to free up those tissues would be a good start. Problem solving all the redundant combinations of problems for all the issues in the body is NOT something I plan on doing here for free, not could I do it accurately over the internet. So if you have a basic question, ask away. If you want me to problem solve for you (for free), you would be better off slamming your head in a door.

Knee Rehab
Knee rehab is a snake oil business at best unless you can identify what/where weaknessess are coming from.
Foam rolling and SMR should be your friend and you should identify which tissues are sensitive to the SMR and correct this sensitivity (usually due to a trigger point).
This video shows the Terminal Knee Extension (TKE) which is the basis for most knee rehab.
This video is part one of several (I think 8) and Buddy Morris is VERY knowledgeable about fixing knee issues, being a former NFL head/strength coach. He gives a good progression/regression for TKE's somewhere in one of the parts of this interview: ie watch all of them.
If this video has information you need be sure to seek out the other parts to this interview.

This video below has several good ideas for knee rehab, however, I would personally use them as a method of evaluating for problems, not necessarily the method of correcting them.

Lastly, for more information on traction/distraction, check out this:
http://www.t-nation.com/readArticle.do?id=1105903

Wednesday, July 6, 2011

Band Traction (Part 1 of 2)

JumpStretch Bands are useful in many, many ways

Band Traction
   This technique is used for treating many ailments common to joints, however it isn’t commonly utilized, I fear due to ignorance of it. Seeing as how it has fixed many issues and lessened (or even eliminated) many cases of joint pain, I feel its use amongst athletes should be more common.
   Common traction involves attaching a band to a stationary object and also to a body part/limb, and pulling the body away from the anchor to generate tension. This tension generated by the elastic properties in the band can serve to lengthen the joint complex it is applied to and can cause several audible ‘pops’ as blood gases trapped inside the joint can be released. These sounds do not correlate to any benefit or beneficial effect other than a possible placebo effect of pain reduction. The relocation of the joint itself however, including the lengthening of chronically shortened/inflamed/irritated stabilizer muscles, can be of actual benefit to the user. We generally go for several minutes (at least 60 seconds) in each position as part of a good warmup, although this is also done on days off to better prepare ourselves for the next training day. Many consider this recovery work since it helps them so much.
   Shoulder Traction
   If you check out the following links you can see Dave Tate (CEO of Elite FTS) showing how overhead, frontal, and lower traction can be set up on the shoulder complex. This is good, but a very basic overview.
http://train.elitefts.com/exercise-index/band/shoulder-band-traction-overhead/
http://train.elitefts.com/exercise-index/band/shoulder-band-traction-forward/
http://train.elitefts.com/exercise-index/band/shoulder-band-traction-bottom/
There are more ways to develop traction in the shoulder complex that are less common, and most are usually more effective in generating the effect we want. Here is a series of photos to show how the band is wrapped AROUND the wrist instead of being held in the hand:
Step 1
Step 2: Wrap over
Step 3: Wrap under
Step 4: Wrap under complete
Other positions for shoulder traction:
  
Note staggered stance, same side leg forward, and thumb upward pointing
Another view for better visibility
The pictures above show a lunge-type stretch done facing away from the band traction anchor point. The key points here that make this traction position different are 1) the thumb must face upward to pull the shoulder back in relation to the pectoral structure (can help correct anterior shoulder positioning and overtight pecs), and 2) the forward leg in this staggered stance is the same side as the arm/shoulder being tractioned (this ensures a "lean-away" position and a much better stretch)

Kneeling position, note head lower than plane of shoulders
This kneeling position helps with MANY things all at once, and overhead traction (and behind the head traction even) is a position/ROM so foreign to many of us that this will start correcting issues very quickly. This can stretch and pull apart fascia and muscles in the lats, pecs, shoulder complex, etc. and does so in a plane seldom experienced in adult life. Lean/sit away from the traction anchor point and if this position is 12 o'clock, lean a little to the left for a 10 o'clock position and added ROM/fascia work, and then repeat to the right for a 2 o'clock position as well.

 If you would like a more technical description and a little more info on shoulder traction, go here:
http://charlieweingroff.com/2010/12/shoulder-traction/

Ankle Traction
The next 4 photos show how to set up basic traction for the ankle that allows for independent inversion/eversion of the ankle. This works exceedingly well for tractioning ankle sprains, and sore ankles. You can adjust the tension independently for inversion/eversion traction by looping the band around the anchor multiple times for higher tension. Mini bands work well, so do monster minis; even micro miniswork for sore or sensitive ankles.
Loop around foot to one side
Lower section of band moved below heel
Loop another band around to other side
Pull bands up and away to anchor
Alternative Single Plane Ankle Traction
This picture shows the setup for simple traction and allows for ankle traction in one plane, as well as a manner of stretching the plantar fascia and arch structure.
Pull top arch structure away and traction band against this tension closer toward toes.

Shows an easy way of setting up this by yourself
Lower Back TractionThis video was created by Dick Hartzell (inventor of Jumpstretch Bands) I believe and shows several ways to generate lower back traction and several ways that arent common (lumbar traction w/ back extension). Refer to this if you have problems setting up the traction from the pictures I provided or to simply get another point of view:


Alternative Method 1: Decompression and Simultaneous Traction
This method is very efficient for reducing back pain due to disc injury and was shown to me by my friend Eric Richardson, with some alteration for increased traction. Setting up this traction is difficult until you learn how to scoot back and roll the ball back underneath yourself a little at a time. Be sure to let your bodyweight sit fully onto the swiss ball and also be pulled away by the band. We find average or strong bands to be best for this, especially for those over 200 lbs.
Loop band around T-Spine and under armpit
Lean forward and drop center of bodyweight onto apex of swiss ball. Allow band to pull shoulders away from hips and lengthen the spine.
Alternative Method 2: Similar to Egoscue Method
This method allows for contralateral traction across the pelvis/spine complex; this is accomplished by letting the leg hanging in the traction band to freely pull downward, generating its own traction. This leg should sit here in traction for at least 6 minutes, and for best effect 10 minutes is reccommended. While this mild traction occurs, the lumbar spine should be flattened out to touch the floor. The arch in the spine should decrease during this time and the real key here is to attempt to touch your belly button to your spine (TVA activation). Make sure the opposite leg (not in traction) maintains 2 90-degree angles: at the hip, and at the knee. Placing this leg on a chair or bench works equally well. This traction helps immensely with lengthening hamstrings and glutes. Make sure you get both legs tractioned!


Hip Traction
Very few people do better at explaining the 'super couch' position/stretch than the guy who invented it - Kelly Starret. I wont attempt to show you pictures of myself when Kelly already has a video on it, how to set it up, and he happens to be big into manhugs. lol. Enjoy:


Neck Traction
Neck traction is fairly easy to accomplish and can be done by laying back with a band holding up the weight up the skull. If you feel light headed or like you will pass out, get out of the traction setup. Be sure to wrap a small towel around the band to avoid essentially choking yourself out! This can be done with a foam roller underneath the neck as well, and both setups can be effective at removing tension headaches as a nice bonus.
Be sure you can maintain circulation to your head: its not too hard to pinch off the carotid arteries like this.
Article 2 will be coming soon on band distraction (traction with movement).